iDRAC - Dell Remote Access Card
Types:
- DRAC 5 - Dell Remote Access Card - server remote management via http/https protocol. (eg. DELL 1950 or DELL 2950).
- iDRAC 6 embedded BMC - basic server management, integrated into all DELL PowerEdge servers that we offer. BMC is not available via web interface by the DELL servers.
- iDRAC 6 express - more advanced server management via web interface using SSL is directly integrated in servers R610, includes limited functions.
- iDRAC 6 enterprise - advanced server management via web interface using SSL. Connecting via an independent network card. Using iDRAC enterprise can be activated remote desktop, connected the virtual drive installed/reinstalled system through the use of ISO file etc.
Differences between BMC and iDRAC
BMC - Baseboard management controller
The powerful DELL PowerEdge servers as well as many other servers are equipped with the BMC module that is used mainly for remote administration and hardware diagnostics. Technically it is a separate microprocessor integrated on the motherboard. The BMC is activated immediately after connecting the power supply of the server. BMC operates independently of the used operating system and it does not matter whether the server is on or off. For BMC administration it must be assigned the public IP address.
If you are interested in activation of BMC, contact us through the contact form and we help you with its configuration. The activation and operation of BMC is on all supported DELL servers for free.
The main functions of BMC include:
- temperature sensors;
- voltage sensors (control on/off/reset server);
- fan speed sensors;
- detection of opening chassis;
- BIOS remote management.
There are two ways for connecting to a remote server:
1. IPMI over LAN
This method hasn´t graphical interface, indications of the hardware server state are written using the ipmi command and arguments.
Linux - there is a package ipmitool in distributions CentOS and Ubuntu
- ipmitool installation on CENTOS
#yum install ipmitool
sample commands:
BMC IP: 192.168.0.120, user: admin, password: admin
- power status detecting - status/on/off/hard reset/soft reset (same as CTRL+ALT+DEL with a fact that the server shuts down so it is necessary to turn it on)
#ipmitool -H 192.168.0.120 -U admin -P admin power status|on|off|cycle|reset|soft
- sensors:
#ipmitool -H 192.168.0.120 -U admin -P admin sensor|sdr
- eventlog (system log):
# ipmitool -H 192.168.0.120 -U admin -P admin sel
# ipmitool -H 192.168.0.120 -U admin -P admin sel get -begin 3 -max 2
# ipmitool -H 192.168.0.120 -U admin -P admin sel get -last 4
Windows – download Dell BMC Utility at www.support.dell.com
Then there are two startup files ipmish.exe and ipmitool.exe in the directory C:\ProgramFiles\Dell\SysMgt\bmc
- power status detecting
#ipmish -ip 192.168.0.120 -u admin -p admin power status|on|off|cycle|reset -force
- findings basic information about the server including BIOS version
#ipmish -ip 192.168.0.120 -u admin -p admin sysinfo id
#ipmish -ip 192.168.0.120 -u admin -p admin sysinfo fru
- eventlog (system log):
#ipmish -ip 192.168.0.120 -u admin -p admin sel
#ipmish -ip 192.168.0.120 -u admin -p admin sel get -last 10
2. SOL proxy
This method allows access to BIOS, RAID and BMC settings, access to the console via redirected serial port after system start.
The main premise is the correct settings of redirecting the serial port in BIOS!
Linux – download Dell Linux Remote Access Utilities (compatibility especially with RedHat and SuSe) at www.support.dell.com
- client installation on Centos -
# cp OM_5.5.0_MgmtStat_A00.tar.gz /usr/src/
# cd /usr/src
# tar -xzvf OM_5.5.0_MgmtStat_A00.tar.gz
# cd linux/bmc/
# rpm -e osabmcutil9g-RHEL*
after the installation it is necessary to log in to SOL proxy using telnet:
# telnet localhost 623

redirection of the console to the serial port in CentOS:
/etc/inittab - the added line: S0:2345:respawn:/sbin/agetty -h ttyS0 19200 vt100
/etc/securetty - for a root login add the line: ttyS0
Windows – download Dell BMC Utility at www.support.dell.com
installation
start-up service SOL Proxy
connection using the terminal client to localhost port 623 via Winsock - as a client you can use Hyperterminal from Windows XP, telnet client CRT, SecureCRT or even http://www.hilgraeve.com/htpe/index.html
Sample windows:
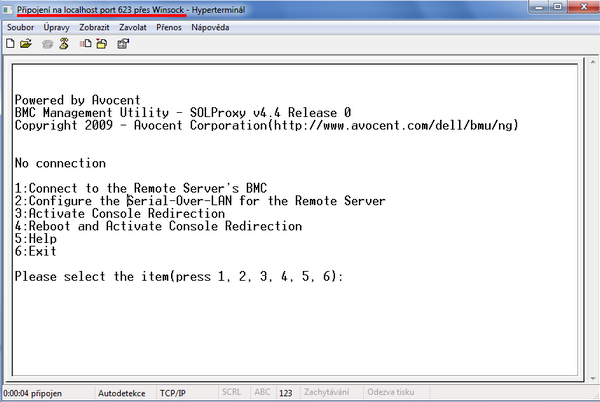
1) Login to the remote server (enter user, password and key). Key is not used by default - just press ENTER.
2) Configuration of the Serial-Over-LAN.
3) Activation of the console. In case that the server is off, after the console activation server is on.
4) Restart server and the subsequent activation of the console - suitable for accessing the BIOS.
Safety warnings: the communication with BMC is not encrypted, it is running on port 623/UDP.
links:
http://support.euro.dell.com/support/edocs/software/smsom/5.4/en/peosom/rac_solu.htm
http://docs.us.dell.com/support/edocs/software/svradmin/1.9/en/ug/plat.htm#wp1048349